I was at the wet market buying my weekly fresh produce. While I was at my butcher, I impulsively pointed at a slab of pork belly without really thinking about what I’m going to do with it. My first inclination was to make Siew Yok (Crispy Roast Pork Belly) but I just gave my oven a throughout scrubbing down just a day again, and I’m not planning to work those arm muscles the same way any time soon.
So the piece of pork belly was spared that day, but not for long! The next day, I tried my luck and invited my mum over for dinner. So happen, that social butterfly mother of mine was free for dinner! Without a thought, I knew I had to make dong po rou as I knew that my mummy will really enjoy it. I started preparing after I hung up the phone with her as the braising process is going to take hours to yield a melt in the mouth tender pork belly.
I’m so glad I made this for her that evening! If you know my mum, she is very typical Chinese, to get any kind of verbal affirmation or praise from her is almost like trying to teach pigs to fly. My husband can attest to that. So when I nervously served my dong po rou to her, she exclaimed “Wahhh!”. I silently affirmed myself, “Wah is good! Wah means good!”. Mind you, I’m confident when it comes to food and cooking, but satisfying my mummy’s tastebuds are not an easy feat.
Mummy didn’t utter a word during dinner, so after dinner I boldly asked her for her feedback. She sternly looked at me and said, “Mmm, got standard (Very good in singlish), good! But can’t cook even longer.” With my mum, there’s always room for improvement. I was beaming, super rare praises from mummy! Woooo Hoooo! So to conclude this dish in three words, “Wah! Got standard!”
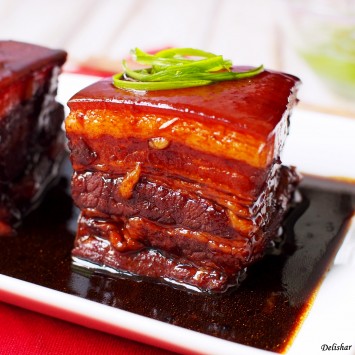
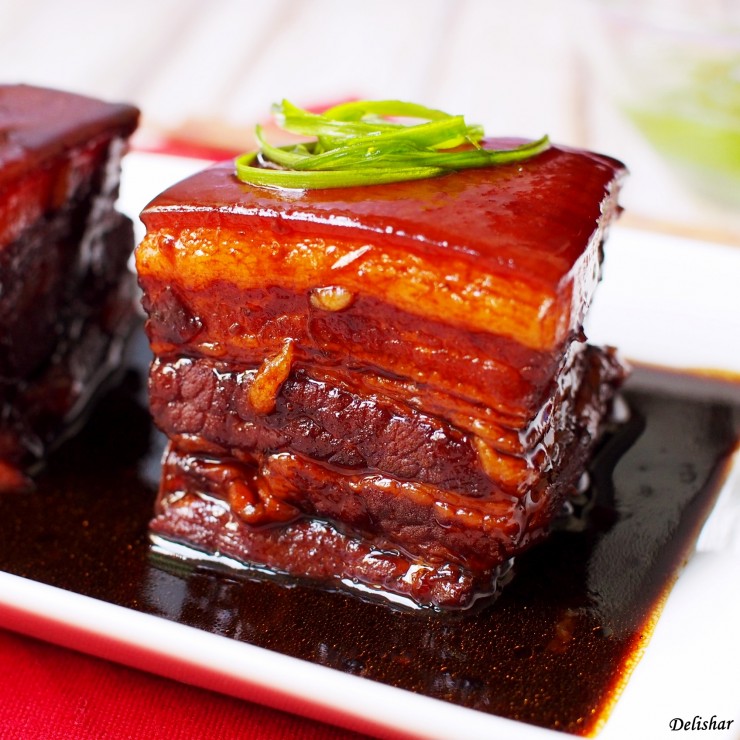
Dong Po Rou (Braised Pork Belly)
Ingredients
- 600 g pork belly
- 2 bunches of spring onions/ scallions cut into 2 inch pieces
- 6 slices of old ginger
- 1/4 cup shaoxing wine
- 3-4 tbsp light soy sauce or to taste
- 2 tbsp dark soy sauce
- 50 g rock sugar or to taste chopped up
- 1 cup hot water or enough to cover all sides of pork belly
- Sliced spring onion to garnish
Instructions
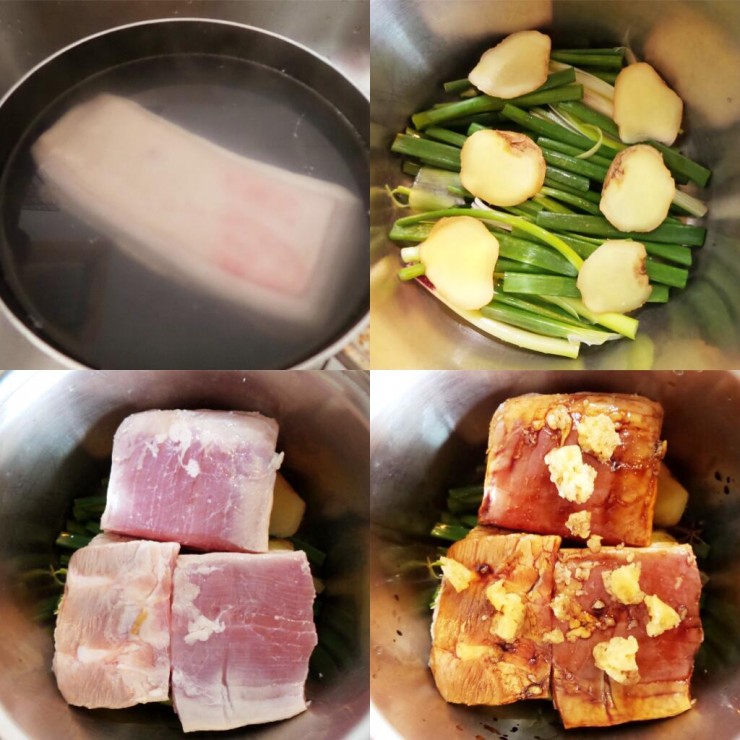
- Wash and clean pork belly, then blanch in boiling hot water for 1 minute.
- Drain and cut into 2x2 inch squares.
- Line your clay pot / stock pot / sauce pan (use one with tall sides that'll nicely fit your pork belly, do not use a wide or large pan.) with spring onions, then layer the ginger slices on top.
- Place pork belly skin side down on ginger, and pour shao xing wine, light soy sauce, and dark soy sauce over.
- Top with rock sugar, then pour water into the pot.
- There is no need to stir.
- Cover and bring to a boil over medium high heat.
- Once boiling, lower heat to low, and simmer for 90 minutes.
- After 90 minutes, carefully flip pork over and simmer for another 90 minutes, basting the skin occasionally.
- Add some water if the liquid is evaporating too quickly.
- Adjust seasoning to taste add more sugar or more soy sauce.
- Sieve out grease before serving sauce over pork belly.
- Garnish with spring onions.
Notes



11 Comments
Elaine Q
29 February, 2016 at 9:11 amLooks delicious. I love it.
Sharon Lam
29 February, 2016 at 9:42 amThank you!!
Roger
6 March, 2016 at 4:10 pmWAHHHHHHHH!!!!!!!!!!!
AG
29 April, 2016 at 7:27 pmHi, I don’t really cook but not sure why I have the courage to challenge this dish. This is really sooooo good. My hubby n kids really love it. The gravy actually dry out after 3 hours of cooking. May I double the water and seasoning without affecting the taste of the meat (that is quantity of meat remains)? Thanks.
Sharon Lam
29 April, 2016 at 10:23 pmHi there Ann! Thanks for trying out the recipe, and i’m glad your family enjoyed it. You can add water 1/2 a cup at a time and cook it down, especially if you use a pan/pot that is wider or if the lid isn’t tight fitting. That’d mean the liquid will evaporate faster, just add water when needed and reduce it. If you are looking for more sauce, then yes, just adjust the soy and sugar to taste. 🙂
AG
1 May, 2016 at 6:57 amThanks Sharon. Will definitely try this again.
Emme
20 June, 2016 at 10:06 amHi Sharon,
I had craving for kong bah bao yesterday. So I cooked some braised pork belly using your recipe. It was really yummy! My family loves it.
Thank you for sharing this recipe as well as the many more yummy recipes. All the recipes you shared look good and taste great.
James C
17 July, 2017 at 1:53 pmI tried this, although, with larger proportions, so I scaled things up proportionately… mine didn’t come out caramelized, nor did it have that deep molasses coloring (the sauce didn’t either, even after I meticulously served out the fat) – did I not add enough soy sauce? Too much water? The pork tastes delicious, but I feel like I missed an important step…
Sharon Lam
19 July, 2017 at 1:50 amHi James, what kind of pot did you use? The pot should fit snugly with not too high of a side. Did you omit any ingredients or allow the liquid to reduce? The dark soy sauce and sugar should give it that deep molasses colour when reduced. Not a lot of sauce is left after reduction, just thinner caramel like gravy. So far those who have tried was able to achieve that deep colour. I’m also wondering if it’s the brand of soy sauce used?
James C
19 July, 2017 at 9:17 amInteresting… I misread the instructions and used a high walled pot that fit the poor belly snugly! Maybe that’s what went wrong! I used all the right ingredients (I’m no stranger to HMart haha – I’m half Korean and my girlfriend is Chinese), so I don’t believe that was the issue. When aforementioned girlfriend ate it though, she said “it tastes like my childhood, it’s so good” but maybe she was being nice!! I’ll try with a shallower pot next time and report back 🙂
Sharon Lam
19 July, 2017 at 10:02 amLol! at least the taste was on point! You didn’t read wrongly. it’s just a little challenging to describe the pot accurately. Mine was tall side but a small pot so the pork sits about 1 to 1.5 inches below the rim of the pot. Too wide and it may condense too quickly. Just allow the sauce to reduce further to a glaze/gravy like consistency, and baste the meat every now and then. No harm adding another tbsp of dark soy sauce for the colour. Have fun!